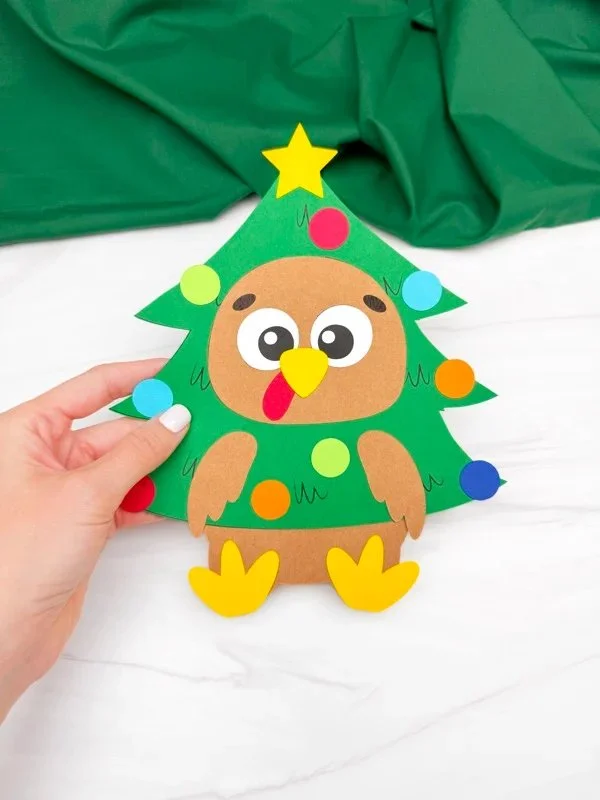
Create a fun and festive Christmas Tree Turkey Disguise with this easy DIY project! This delightful holiday craft combines the spirit of Thanksgiving with the joys of Christmas, making it a perfect seasonal decoration. With a simple printable template, you can engage in a creative DIY activity that’s budget-friendly and suitable for crafters of all levels, especially beginners. Let’s embellish your home with this unique and playful holiday craft!
WHY YOU WILL LOVE THIS Christmas Tree Turkey Disguise
Making the Christmas Tree Turkey Disguise is enjoyable and rewarding for several reasons:
- Easy for Beginners: This craft is perfect for those new to DIY projects. You don’t need to be an expert to create something charming and festive.
- Uses Simple Materials: The project requires basic supplies that you might already have at home, making it accessible and budget-friendly.
- Budget-friendly: Create a festive decoration without breaking the bank! This craft uses minimal materials, ensuring that you save money while having fun.
- Quick to Make: With an estimated completion time, you can whip this up in no time, ideal for busy holiday schedules.
- Great for Home Decor: This creative DIY project will add a unique touch to your Christmas decorations.
- Easy to Customize: You can personalize your turkey disguise to match your decor needs or even your taste.
Get ready to have fun as we dive into this engaging and creative DIY idea that’s perfect for the holiday season!
PROJECT DETAILS
Skill Level
Beginner – This project is designed for those who are just starting their crafting journey.
Estimated Time
Approximately 30-45 minutes – Suitable for a quick afternoon craft session.
Approximate Cost
Under $10 – Use everyday materials to keep costs low.
Best For
Families, children, and anyone looking for seasonal crafts to decorate their holiday space.
Project Type
DIY home decor – A creative way to celebrate the fusion of Thanksgiving and Christmas at home.
TOOLS AND EQUIPMENT NEEDED
Scissors
You will need scissors to cut out the printed turkey parts from the template. Choose a good pair to ensure clean cuts.
Glue
A glue stick or craft glue will be necessary for attaching various parts together. This will keep everything securely in place and is easy to use.
Printer
A color printer will be required to print the free template. Ensure you have good quality ink for vibrant colors.
Paper
Standard printer paper is adequate for this project. You might consider using cardstock for more durability if you desire sturdier decorations.
MATERIALS
Free Printable Template
The main component of this craft. The template includes all the parts needed to assemble the turkey disguise that will hang on your Christmas tree.
Colored Markers or Crayons
Optional items for adding a personal touch to the turkey disguise if you wish to add more detail or creativity.
Decorative Ornaments (Optional)
These can be added around your turkey to enhance the festive vibe. Use small ornaments or glitter for added sparkle.
Craft Foam or Felt (Optional)
For added durability and a fun texture, consider using craft foam or felt for parts of the turkey instead of paper.
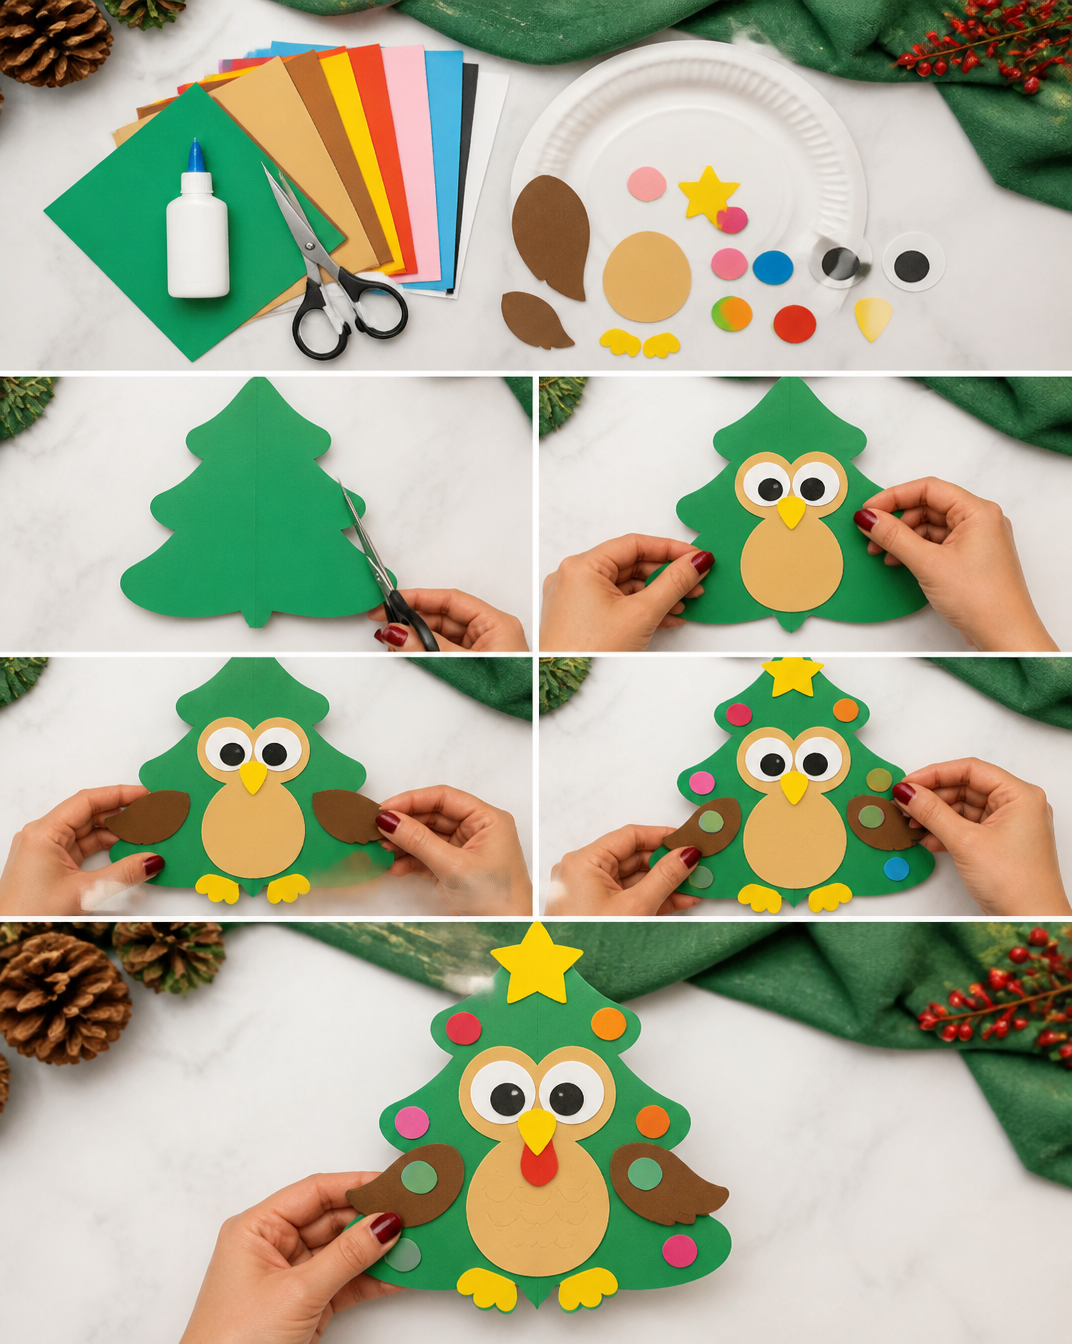
HOW TO MAKE Christmas Tree Turkey Disguise
Now that you have all your materials ready, let’s create the Christmas Tree Turkey Disguise by following these easy steps!
Step 1: Download and Print the Template
Start by downloading the free turkey template from the provided link. Print it out on your colored printer. This template provides all the necessary parts for your craft.
Step 2: Cut Out the Pieces
Using scissors, carefully cut out each of the turkey pieces. This includes the head, wings, body, feet, and any additional decorations. Take your time to ensure clean cuts for a neat appearance.
Step 3: Assemble the Face
Begin by gluing the eyes just below the eyebrows on the head piece. This adds character to your turkey disguise. Next, take the snood (the fleshy part hanging from a turkey’s beak) and glue it below the eyes.
Step 4: Attach the Beak
Glue the beak on top of the snood. Make sure it’s well-placed so that the turkey looks authentic and inviting.
Step 5: Position the Head
Glue the finished turkey head in the center of your Christmas tree. This will be the focal point of your disguise.
Step 6: Add the Wings
Take the wings and glue them below the head. Position them so that they look as if they are proudly displaying the turkey look.
Step 7: Glue the Lower Body
Attach the lower body piece to the back and bottom of the tree, aligning it with the head for a cohesive look.
Step 8: Attach the Feet
Now, glue the feet to the front and bottom portion of the tree. This final touch solidifies the turkey disguise.
Step 9: Add the Star and Ornaments
Finally, glue a star on top of the Christmas tree and decorate with ornaments around the turkey. This is your chance to personalize the craft with your favorite colors and decoration styles.
TIPS AND TRICKS
- Choosing Materials: Use materials that are readily available at home to create a budget-friendly DIY project. Familiar materials keep the process straightforward and enjoyable.
- Cutting Techniques: When cutting out intricate designs, take your time. Smaller scissors can help navigate around details more easily.
- Glue Application: Use a glue stick for lighter paper or craft glue for more durability. Apply a thin layer for better adherence and to prevent excess mess.
- Common Mistakes: Ensure everything is glued securely before lifting it, as loose parts can fall off. Use enough glue but avoid over-saturating any area.
- Add Flair: Don’t hesitate to add your personal touch with stickers or embellishments that reflect your style.
- Saving for Next Year: Store your Christmas Tree Turkey Disguise in a cool, dry place. This craft can be reused year after year with proper handling.
VARIATIONS AND CUSTOMIZATION IDEAS
- Different Colors: Personalize your turkey by using different colors for the beak, snood, or turkey body. Bright colors can make your Christmas tree stand out more.
- Seasonal Versions: Try creating Thanksgiving-themed decorations by simply altering the colors and adding harvest symbols like pumpkins or leaves.
- Bigger or Smaller Designs: Scale up or down the template size according to your Christmas tree size; a bigger turkey for larger trees or mini versions for tabletops.
- Add Textures: Use glitter glue or textured materials like feathers for a more dynamic look.
- Personalized Names: Customize the turkey disguise by adding family members’ names or fun messages for a personal touch.
Christmas Tree Turkey Disguise FAQ
Q1: Is this craft difficult to make?
No, the Christmas Tree Turkey Disguise is a beginner-friendly craft. It involves simple cutting and gluing techniques that are easy to manage.
Q2: What materials do I need for this project?
You will need a printed template, scissors, glue, and any optional decorative materials you wish to add. All are common and easy to find.
Q3: How do I store the finished craft?
Ensure it is kept in a cool, dry place to maintain its condition. You can store it in a plastic bag or a box to prevent damage during other holiday activities.
Q4: How long does it take to complete the craft?
The entire process should take around 30-45 minutes, making it a quick and fun holiday project that fits well into busy schedules.
Q5: Can I customize the colors of the turkey?
Absolutely! Feel free to use different colors for the wings, body, and accessories to match your holiday decorations or personal preferences.
CONCLUSION
The Christmas Tree Turkey Disguise is an easy and enjoyable craft that’s perfect for the holiday season. With its simple materials and straightforward steps, it’s a great project for beginners and families wanting to engage in festive fun together. This budget-friendly DIY can lighten up your home decor and bring a smile to everyone’s face.
I encourage you to try making this adorable holiday craft and share your experiences! Feel free to customize your turkey disguise and let your creativity shine—happy crafting!