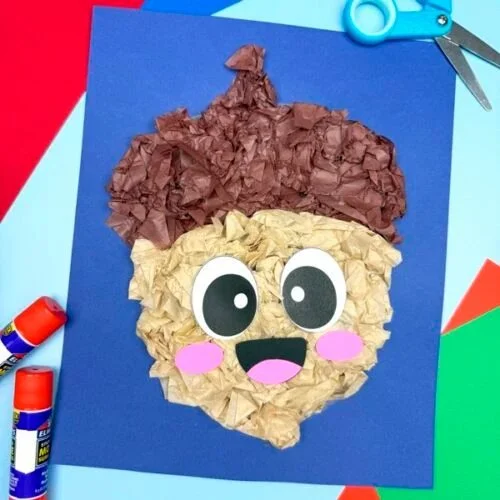
Creating your own seasonal decor can be a fun and fulfilling project, especially when it’s simple and budget-friendly. One delightful option is the Acorn Tissue Paper Craft, perfect for adding a touch of nature-inspired beauty to your home. This easy DIY project uses basic materials like tissue paper and simple tools. You can customize it to fit any holiday or season, making it a versatile addition to your home decor. In this article, we’ll guide you through the steps to create this engaging craft, provide a free printable template, and share tips to ensure your project is a success.
WHY YOU WILL LOVE THIS Acorn Tissue Paper Craft
Making the Acorn Tissue Paper Craft is enjoyable for several reasons:
- Easy for Beginners: This project is designed to be simple and straightforward, making it perfect for those new to crafting.
- Uses Simple Materials: You need just a few common items, so it’s easy to gather everything you need.
- Budget-Friendly: With most materials being inexpensive or already available at home, you won’t break the bank.
- Quick to Make: You’ll have a beautiful decoration in no time, making it great for quick DIY home decor.
- Great for Seasonal Decorating: This craft is perfect for fall or spring decor, allowing you to celebrate the changing seasons.
- Easy to Customize: Feel free to modify colors or patterns to match your style, making it a personalized handmade gift or decoration.
PROJECT DETAILS
Skill Level
Beginner. This craft doesn’t require advanced skills, making it accessible for everyone.
Estimated Time
About 1 hour. You can create your acorn tissues easily within this timeframe.
Approximate Cost
$5-$10. Most materials are inexpensive, and you may already have some at home.
Best For
Home decor, seasonal decorations, or as a handmade gift.
Project Type
Easy DIY project, perfect for crafts for beginners.
TOOLS AND EQUIPMENT NEEDED
Scissors
You’ll need scissors to cut out the tissue paper and any other shapes you decide to include in your design.
Glue Stick
A glue stick is ideal for sticking paper together, giving a clean finish without any mess.
Hole Punch
Using a hole punch will help you create clean holes for any hanging options if desired.
MATERIALS
Tissue Paper
You will use tissue paper in various colors to create the acorn’s top and body, bringing it to life with color.
Printed Template
Our free printable template includes the shapes you’ll need to trace. This saves time and provides a guide for your project.
Cardstock or Craft Paper
This material provides a sturdy base for your acorn, helping it keep its shape once decorated.
String or Twine
Use string or twine if you want to hang your acorn for decoration.
HOW TO MAKE Acorn Tissue Paper Craft
Step 1: Print and Cut Out the Template
Start by downloading and printing the free printable template for the acorn. Use scissors to cut out the shapes along the black outline.
Step 2: Trace the Shapes
Place the cut template pieces on your cardstock or craft paper. Trace around each piece using a pencil, ensuring you have an outline to follow for cutting.
Step 3: Cut Out the Shapes
Carefully cut out the shapes you’ve traced on the cardstock. You should have both the acorn cap and body ready.
Step 4: Prepare the Tissue Paper
Choose your favorite colors of tissue paper. Cut out little squares or circles that will be used to fill in the acorn shape. Aim for varied sizes to create texture.
Step 5: Glue the Tissue Paper
Using a glue stick, apply glue to one side of the acorn body. Start placing your pieces of tissue paper, overlapping them, and making sure to fill each part of the acorn body. Once full, allow it to dry.
Step 6: Attach the Acorn Cap
Once the tissue paper is secure and dry, take the acorn cap piece and glue it over the top of the acorn body. Make sure it fits snugly.
Step 7: Create a Hanging Option (Optional)
If you want to hang your acorn, use a hole punch to create a hole at the top. Thread through some string or twine for hanging.
Step 8: Final Touches
Touch up any areas that may need extra glue or more tissue paper. Let everything dry completely.
![Acorn Tissue Paper Craft [Free Printable Template]](https://cdn.contai.io/public/fal-ai-generated/1789832228_6aaeac24c8da4.png)
TIPS AND TRICKS
- Choosing Materials: Use colorful tissue paper that contrasts well for a vibrant look. Look for seasonal colors to fit fall or spring themes.
- Cutting Techniques: For sharper edges, cut slowly and follow the outlines carefully. This will make your pieces look more professional.
- Gluing Tips: Avoid using too much glue to prevent wrinkling the tissue paper. A thin layer is sufficient for adhesion.
- Common Mistakes: Ensure the tissue paper lies flat when glued down to avoid bulging.
- Storage: Store your completed acorns in a cool, dry space. They are not waterproof, so keep them away from moisture.
- Safety: Always supervise children when using scissors and glue to avoid accidents.
VARIATIONS AND CUSTOMIZATION IDEAS
- Different Colors: Change the tissue paper colors based on the season or occasion—warm tones for autumn, pastels for spring.
- Size Options: Make larger or smaller acorns by adjusting the template size when printing.
- Themed Versions: Create themed acorns for holidays, such as Halloween or Thanksgiving.
- Patterned Paper: Instead of solid colors, use patterned tissue paper for a unique look.
- Personalized Touches: Add names or initials using stickers or paint for a more customized gift.
![Acorn Tissue Paper Craft [Free Printable Template]](https://cdn.contai.io/public/original_images/ZYnRpX6Az4zzRJcvBQOE3UIFA9s4TvJKJKVpyK8E.jpg)
Acorn Tissue Paper Craft FAQ
How difficult is this project?
This craft is very beginner-friendly, making it ideal for those new to DIY crafts.
What materials do I need for this project?
You’ll need tissue paper, cardstock, scissors, a glue stick, and a hole punch.
How do I store my finished acorns?
Store them in a cool, dry place. Keep them away from moisture to prevent damage.
Can I clean the acorn if it gets dirty?
If needed, gently wipe the surface with a dry cloth. Avoid water to maintain the integrity of the tissue paper.
How long will it take to complete this craft?
Estimate about 1 hour to complete the acorn tissue paper craft, including drying time.
CONCLUSION
The Acorn Tissue Paper Craft is an easy, budget-friendly DIY project that provides a fun way to create seasonal decorations. It’s perfect for beginners who want to make something special for their home or as a handmade gift. With simple materials and easy-to-follow steps, you can quickly create beautiful acorns that brighten any space. Encourage your creativity by customizing your project—the possibilities are endless! Try this craft out today, and don’t forget to share your experience and customization ideas!