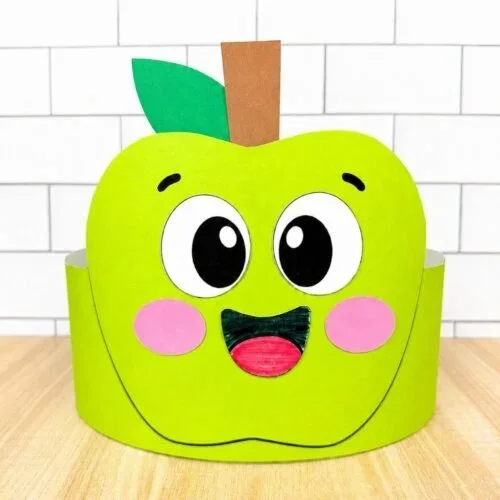
Creating an Apple Headband Craft is a fun and engaging DIY project that kids will love. This easy craft idea allows children to express their creativity while making something unique to wear. Using simple, budget-friendly materials, this beginner-friendly craft can fit into seasonal decorating or themed parties, making it an ideal activity for holidays or just for fun. Plus, we provide a free PDF template to help you get started!
WHY YOU WILL LOVE THIS Apple Headband Craft
Making an Apple Headband is a delightful experience. Here are a few reasons why readers will enjoy this easy DIY project:
- Easy for Beginners: The steps are straightforward, making it suitable even for younger crafters.
- Uses Simple Materials: With items that are often already around the house, you can easily gather everything needed.
- Budget-Friendly: Most materials are inexpensive, making it a great option for families on a budget.
- Quick to Make: You can complete this project in a short amount of time, perfect when you need something fun to fill the afternoon.
- Great for Seasonal Decorating: This headband is perfect for fall or apple-themed parties, enhancing the festive atmosphere.
- Easy to Customize: Kids can choose colors and patterns to create their own unique versions.
PROJECT DETAILS
Skill Level
This project is beginner-friendly. Anyone, regardless of their crafting experience, can hack this craft. It’s also a great way to teach younger children some basic crafting skills.
Estimated Time
You can complete this Apple Headband craft in about 45 minutes to 1 hour, making it suitable for a fun afternoon activity.
Approximate Cost
The cost of materials is under $10, which makes it an affordable option for families or classrooms.
Best For
This project is great for kids’ birthday parties, Halloween, Fall festivals, or any apple-themed events.
Project Type
This is a DIY craft and can be considered a simple and fun project that doesn’t require sewing, making it an excellent choice for children.
TOOLS AND EQUIPMENT NEEDED
Scissors
Scissors are used for cutting out pieces from paper or felt. Ensure they are safe and appropriate for children.
Glue
Craft glue or a glue stick will help keep your pieces attached securely. This is essential for putting together the headband and apple decorations.
Ruler
A ruler can help measure and cut straight lines if needed, making it easier to work with the template.
Pencil
A pencil is useful for tracing designs on your materials before cutting.
MATERIALS
Felt Fabric or Colored Cardstock
These materials are used to create the apple shapes for the headband. They come in various colors, allowing for creativity.
Headband Base
This can be a plain plastic or fabric headband that serves as the foundation for your craft.
Green Pipe Cleaners
These will be used for the leaves and stems of the apples, giving a nice touch to your headband.
Optional Embellishments
Items like sequins or stickers can be added for personalization, making the craft more decorative.
Free PDF Template
The Apple Headband template provides outlines for apples and leaves, making it easy to create consistent shapes.
![Apple Headband Craft for Kids [Free PDF Template]](https://cdn.contai.io/public/fal-ai-generated/1789832223_6aaeac1febae5.png)
HOW TO MAKE Apple Headband
Step 1: Gather Materials
Collect all the tools and materials you need for this craft. Having everything ready helps the process go smoothly.
Step 2: Download and Print the Template
Download the free PDF template, print it out, and cut out the apple and leaf shapes from the template.
Step 3: Trace the Templates onto Your Material
Using a pencil, trace around the cut-out apple and leaf shapes onto the felt fabric or colored cardstock. You can make several apples or leaves if you want more decoration.
Step 4: Cut Out the Shapes
Carefully cut out the traced shapes with scissors. Make sure the edges are clean for a polished look.
Step 5: Assemble the Apples
Taking a green pipe cleaner, twist and shape it into the stem of the apple. You can attach a leaf by wrapping it around the base of the stem.
Step 6: Attach the Apples to the Headband
Use glue to attach the apples to the headband base. Press down gently to ensure they stick well, and let it dry for a few minutes.
Step 7: Add More Decoration
Now that the apples are in place, consider adding additional embellishments like sequins or stickers for extra flair.
Step 8: Let It Dry
Ensure everything is securely attached. Let the headband dry fully before trying it on.
TIPS AND TRICKS
- Choosing Materials: Opt for colorful felt or cardstock to make the apples pop. This also allows for easy cutting and shaping.
- Cutting: For younger kids, consider pre-cutting the shapes to make it easier and safer.
- Gluing: Be cautious with glue usage. A little goes a long way – too much can cause things to slide around or not adhere properly.
- Personalizing: Allow kids to write their names on their headband for a special touch.
- Storing: Once finished, store headbands in a cool, dry place to keep them from becoming misshaped.
- Durability: Felt tends to hold up well, but avoid getting the headband wet for longevity.
VARIATIONS AND CUSTOMIZATION IDEAS
- Different Colors: Change the colors of the apples or leaves for different seasons or personal preferences.
- Size Options: Adjust the sizes of the apples and leaves on the template to fit various headband sizes.
- Alternate Materials: Instead of felt, consider using glitter paper for a sparkly effect.
- Seasonal Versions: Create headbands for other fruits or themes to celebrate different seasons or holidays.
- Patterns: Decorate the apples with different patterns like polka dots or stripes to make them more interesting.
![Apple Headband Craft for Kids [Free PDF Template]](https://cdn.contai.io/public/original_images/cXOJTy1OGejvZZwL6evMr775EuIM8chavTGzmQn8.jpg)
Apple Headband Craft FAQ
How hard is the Apple Headband craft?
This craft is beginner-friendly and is very easy to make, requiring minimal skills.
What materials do I need for this craft?
You need felt or cardstock, a headband base, glue, scissors, and optional decorations like sequins.
How do I store the finished headband?
To keep it in shape, store the finished headband in a cool, dry place, away from direct sunlight.
Can I clean the headband?
If the headband gets dirty, lightly spot-clean it with a damp cloth. Avoid soaking it in water.
How long will this craft take?
You can complete the Apple Headband craft in about 45 minutes to an hour, depending on your speed and creativity.
CONCLUSION
The Apple Headband Craft is an easy and engaging DIY project that kids will love to create. It’s a perfect beginner-friendly craft that involves simple materials and provides a quick and budget-friendly way to make creative decorations. Whether you use it for seasonal fun, gifts, or parties, this craft will surely delight. Don’t hesitate to try making one and share your customization ideas or finished projects with friends and family!