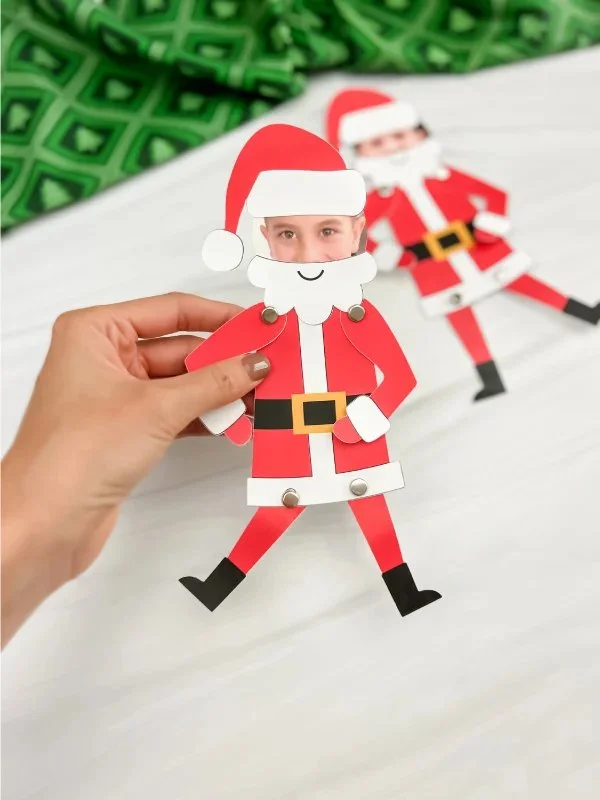
Getting into the festive spirit can be a lot of fun, especially when it involves crafts! The "Moveable Santa Photo Craft" for kids provides an easy DIY project that allows children to create a delightful decoration while learning about arts and crafts. This project is not only enjoyable but also perfect for holiday decor, gifts, or making homemade decorations. The simple materials and clear instructions make this craft a wonderful option for families looking to engage in a creative, budget-friendly activity. Plus, it can easily be customized to fit different themes or personal styles!
WHY YOU WILL LOVE THIS Moveable Santa Photo Craft
This Moveable Santa Photo Craft is an excellent choice for many reasons:
- Easy for Beginners: The project is designed to be beginner-friendly, making it simple enough for children to follow with minimal adult supervision.
- Uses Simple Materials: You only need a few common materials that you might already have at home, eliminating the need for costly supplies.
- Budget-Friendly: This craft is an inexpensive way to get into the holiday spirit without breaking the bank.
- Quick to Make: The project can be completed in an hour or less, which is perfect for busy families during the holiday season.
- Great for Home Decor: Once completed, this craft can be displayed in your home, adding a charming touch to your holiday decorations.
- Perfect for Gifts: Kids can create this craft as a special handmade gift for family and friends.
- Easy to Customize: There are plenty of ways to personalize the Santa, making it a fun activity for kids and parents alike.
PROJECT DETAILS
Skill Level
Beginner-Friendly: The craft is suitable for children and beginners, ensuring everyone can participate and enjoy creating this festive decoration.
Estimated Time
30-60 Minutes: Depending on the child’s skill level and complexity of design, this project typically takes between half an hour to an hour.
Approximate Cost
$5-$10: Most materials are inexpensive and easy to find, keeping the total cost minimal.
Best For
Kids age 5 and up: This project is recommended for children aged 5 and older, with some adult guidance for younger ones.
Project Type
Holiday Craft: This is a seasonal craft ideal for Christmas and festive occasions, making it a perfect holiday activity.
TOOLS AND EQUIPMENT NEEDED
Scissors
Used to cut out the template and paper materials for the craft, scissors are essential for shaping the Santa figure and any additional components.
Glue Stick
A glue stick is used to attach various parts of the craft, ensuring everything stays in place once assembled.
Printer
A printer is necessary if you are using a template to print out the Santa’s parts. This allows for easy assembly without complicated drawing.
Markers or Crayons
Markers or crayons can be used for coloring and adding personal touches to the Santa figure, giving kids a chance to express their creativity.
MATERIALS
Printable Template
The template provides the shapes and designs needed to create the moveable Santa, making it easier for kids to start crafting.
Colored Paper
Colored paper adds vibrancy to the craft. Children can choose their favorite colors for Santa’s outfit, hat, and other features.
Wooden Craft Sticks
These sticks serve as the base for the moveable component of the craft, allowing Santa’s arms or legs to move when the craft is complete.
Tape
Tape is used for securing elements that may not require glue or for additional support in assembly.
Decorative Items (optional)
Items like glitter, stickers, or fabric scraps can be used for embellishments, enhancing the overall look and feel of the finished project.
HOW TO MAKE Moveable Santa Photo Craft
Follow these simple steps to create your Moveable Santa Photo Craft. Remember to involve kids in each part of the process for a fun and educational experience.
Step 1: Prepare the Template
Print the provided Santa template on colored paper. You can customize by choosing different shades for Santa’s outfit, beard, and face.
Step 2: Cut Out the Pieces
Using scissors, carefully cut out each part of the Santa template. Make sure to follow the edges closely for a clean look. This step can spark discussions about shapes and cutting techniques.
Step 3: Color and Decorate
Use markers or crayons to color in the Santa pieces. Encourage children to be creative and use different patterns or designs on the clothes and hat.
Step 4: Assemble the Crafts
Take the colored paper cutouts and glue them onto the wooden craft sticks. For instance, attach Santa’s head to one stick, his arms, or legs to others, creating a movable character.
Step 5: Add Movement Features
Secure the arms or legs to the stick using tape or glue, ensuring they can move freely. You can create a pivot point using a small piece of card stock for additional movement.
Step 6: Final Touches
Add any decorative items like glitter or stickers to enhance your Santa’s appearance. This step allows for personalization, giving each child a chance to bring their unique vision to life.
TIPS AND TRICKS
- Choosing Materials: Use materials that are sturdy enough to hold the craft together, particularly when working with younger kids.
- Cutting Techniques: Demonstrate how to hold the scissors properly to avoid accidents while cutting. It encourages safe crafting habits.
- Avoiding Common Mistakes: Remind children to be patient when gluing or taping parts together. A small amount of glue goes a long way!
- Getting a Better Finish: Suggest kids take their time with the coloring to ensure an even finish without rushed strokes.
- Saving Money: Gather materials from around the house or consider upcycled crafts, like repurposing cardboard or other items.
- Making the Craft Last Longer: Use clear tape on any edges or parts that may be prone to wear and tear, enhancing durability.
- Working Safely: Supervise children, especially when using scissors, and ensure they handle tools properly.
VARIATIONS AND CUSTOMIZATION IDEAS
Here are some fun ways to customize the Moveable Santa Photo Craft:
- Different Colors: Experiment with various colors for Santa’s outfit, including non-traditional colors like blue or green for a unique twist.
- Seasonal Versions: Create Santas based on themes like Christmas in summer, depicting him in tropical attire.
- Different Patterns: Use patterned paper for Santa’s clothes, bringing a fresh look to the project.
- Personalized Versions: Encourage kids to write their names or messages on the Santa figure, making it a personal gift for family members.
- Add Accessories: Include items like a small present or a reindeer to accompany Santa for a more seasonal look.
Moveable Santa Photo Craft FAQ
What is the difficulty level of this craft?
The Moveable Santa Photo Craft is beginner-friendly, making it easy for young children to make with little assistance.
How long does this craft take to complete?
Typically, the craft can be completed within 30 to 60 minutes, depending on the child’s number of embellishments and complexity.
What materials do I need?
You will need a printable template, colored paper, wooden craft sticks, glue, scissors, markers, tape, and optional decorative items.
How long will my finished craft last?
With proper handling and care, especially if you reinforce the joints, the craft can last through the holiday season and even be used the following year.
Can I customize my Santa craft?
Absolutely! Children can use different colors, patterns, and decorations to personalize their Santa, allowing for unique variations that suit their style.
CONCLUSION
The Moveable Santa Photo Craft is an easy, creative, budget-friendly DIY project that is perfect for children and families during the holiday season. Utilizing simple materials and providing clear instructions allows for fun while promoting creativity. This project makes a delightful decoration suitable for your home or as a handmade gift for loved ones. Don’t hesitate to give it a try! We would love to hear about your experiences, your finished projects, and your creative customization ideas. Happy crafting!