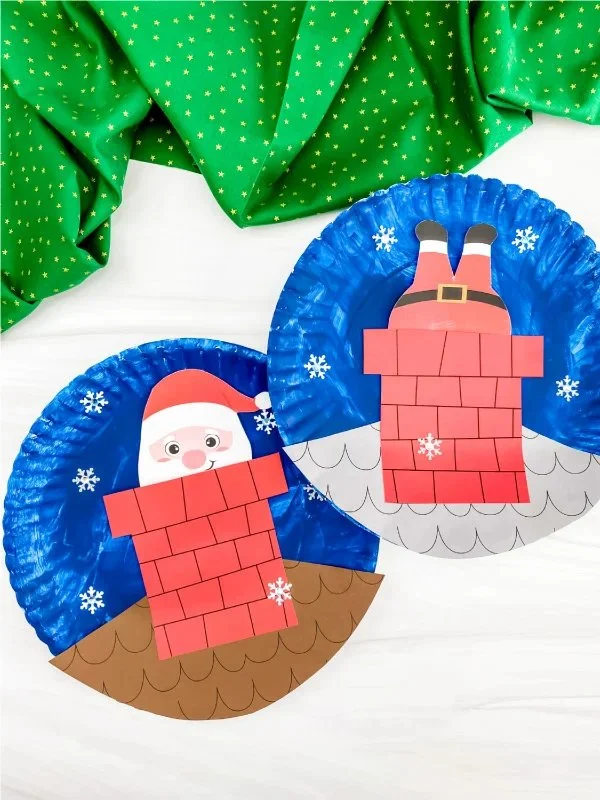
If you’re looking for a fun and engaging craft for the holiday season, the Moving Santa Paper Plate Craft is an excellent choice! This easy DIY project is perfect for kids and beginner crafters alike. With simple materials, clear instructions, and added customization options, this craft will surely spread holiday cheer. Let’s dive into this festive craft idea to create adorable moving Santa decorations for your home!
WHY YOU WILL LOVE THIS Moving Santa Paper Plate Craft
The Moving Santa Paper Plate Craft is an enjoyable and accessible project for anyone eager to create handmade decor for the holidays. Here are some reasons you’ll enjoy making this craft:
- Easy for Beginners: This is a fantastic beginner-friendly craft, perfect for kids or anyone new to crafting.
- Uses Simple Materials: The project mainly utilizes common household items, making it budget-friendly and easy to gather.
- Quick to Make: Unlike some crafts that take hours, this one can be completed in a short time, making it ideal for busy schedules.
- Great for Home Decor: Create delightful decor pieces to hang or display during the holiday season.
- Fun Customizations: Personalizing your Santa crafts allows for creativity and makes each piece unique.
PROJECT DETAILS
Here’s a quick overview of the Moving Santa Paper Plate Craft project.
Skill Level
Beginner – This craft is suitable for all ages, making it a wonderful option for family crafting time.
Estimated Time
30–45 minutes – From gathering materials to completing the craft, this is a relatively quick project.
Approximate Cost
Low – Most materials are affordable, and many items might already be around your home.
Best For
Kids and Families – Ideal for holiday activities, classrooms, or family get-togethers.
Project Type
Holiday Craft – This project fits perfectly into seasonal and holiday crafts.
TOOLS AND EQUIPMENT NEEDED
To create the Moving Santa Paper Plate Craft, you will need the following tools and equipment:
Scissors
Used for cutting the paper plates, construction paper, and any additional decorative elements you may add.
Glue Stick
Perfect for adhering the different components of the craft together. A glue stick is also less messy than liquid glue.
Markers or Crayons
These are essential for decorating your Santa. You can use them to color or add details to personalize your craft.
MATERIALS
Here’s a list of materials you’ll need for the Moving Santa Paper Plate Craft and their uses:
Paper Plates
The main component for the Santa’s body and face. You will require two plates, one for Santa’s face and one to create the “moving” part.
Red Construction Paper
This will be used to create Santa’s hat, adding a vibrant color to your project.
Cotton Balls or White Pom-Poms
These are great for enhancing Santa’s hat and beard, providing a cute, fluffy look.
Googly Eyes
These add a fun touch to your Santa’s face.
Black Marker
Used to create Santa’s eyes and any additional facial features.
Tape
Used to assist in making the moving mechanism, helping Santa to wobble or move.
Optional Decorations
Feel free to add glitter, stickers, or other craft supplies you may want to use to personalize your Santa!
![Moving Santa Paper Plate Craft For Kids [Free Template]](https://cdn.contai.io/public/fal-ai-generated/1789832255_6aaeac3f84cee.png)
HOW TO MAKE Moving Santa Paper Plate Craft
Follow these detailed steps to create your own Moving Santa Paper Plate Craft easily.
Step 1: Prepare Your Plates
Take two paper plates. One will be for Santa’s face and the other for the body or additional parts. Decide which plate you want to be the face.
Step 2: Create Santa’s Hat
Using the red construction paper, cut out a triangular shape for Santa’s hat. Leave a bit of extra paper at the bottom for a fold so that it can fit onto Santa’s head.
Step 3: Decorate Santa’s Face
On the chosen plate, use the black marker to draw Santa’s eyes. Then, glue the googly eyes over the drawn eyes for a whimsical look. For the nose, you can use a small piece of pink paper or a pom-pom.
Step 4: Add Santa’s Beard
Glue cotton balls or white pom-poms around the lower part of the Santa’s face to represent his beard. Fluffiness makes your Santa look quite jolly!
Step 5: Attach the Hat
Now, take the triangular red paper you cut earlier and glue it to the top of the face plate. For added effect, glue a cotton ball at the tip of the hat.
Step 6: Create the Moving Mechanism
Take the other paper plate and tape it vertically to the back of Santa’s face plate (the first plate). Create a simple flap or lever that will allow the top plate to pivot, giving Santa movement as if he is waving.
Step 7: Final Touches
Add any additional decorations you like. You might add details like a mouth or buttons using markers or stickers to add more personality to your Santa.
TIPS AND TRICKS
Here are some practical tips to help ensure your craft is a success:
- Choose Quality Materials: For a better finish, select sturdy paper plates and high-quality glue.
- Be Careful When Cutting: Supervise kids if they use scissors to enhance safety during the crafting process.
- Avoid Overloading with Glue: A little glue goes a long way. Too much can make things messy and take longer to dry.
- Personalize Your Craft: Encourage kids to add their touches to make each Santa unique!
- Storage: Once completed, allow your Santa to dry if necessary. Store it in a dry, cool place away from direct sunlight to maintain its appearance.
VARIATIONS AND CUSTOMIZATION IDEAS
Here are some ways to personalize your Moving Santa Paper Plate Craft:
- Different Colors: Instead of a classic red hat, use different colors or patterned paper for a fun twist.
- Different Sizes: Use larger or smaller paper plates to create varying sizes of Santa.
- Holiday Versions: Create a Snowman or other holiday characters following the same crafting method.
- Different Patterns: Add designs to Santa’s hat using markers or stamps for an extra decorative touch.
- Personalized Versions: Write names on Santa’s hat or body for a more customized gift for friends or family.
![Moving Santa Paper Plate Craft For Kids [Free Template]](https://cdn.contai.io/public/original_images/QCRkAZSoSu12JqGYOYsMxYh3PYqctv1Ge5rUZZ6c.jpg)
Moving Santa Paper Plate Craft FAQ
Here are some frequently asked questions to help you with your craft:
How difficult is this craft?
This craft is beginner-friendly, making it great for kids and first-time crafters. With simple steps and minimal materials, anyone can create their moving Santa!
What materials do I need?
You will need paper plates, construction paper, glue, scissors, markers, cotton balls, googly eyes, and any optional decorations for personalization.
How should I store my finished craft?
Store your Santa craft in a dry place, preferably in a box or on a shelf away from moisture to keep it intact.
Can I clean the craft if it gets dirty?
Yes, you can gently wipe it with a damp cloth. Make sure not to rub too hard as decorations like markers or cotton can come off.
How long does it take to complete this craft?
It typically takes around 30-45 minutes to complete, depending on your involvement and creativity!
CONCLUSION
The Moving Santa Paper Plate Craft is an easy, fun, and creative DIY project perfect for the holiday season. With its beginner-friendly approach, simple materials, and thrilling movement feature, it’s an enjoyable activity for kids and families alike. Whether for home decor or handmade gifts, this craft is sure to bring smiles and holiday cheer. Give it a try, and don’t forget to share your experiences or any customizations you make – happy crafting!