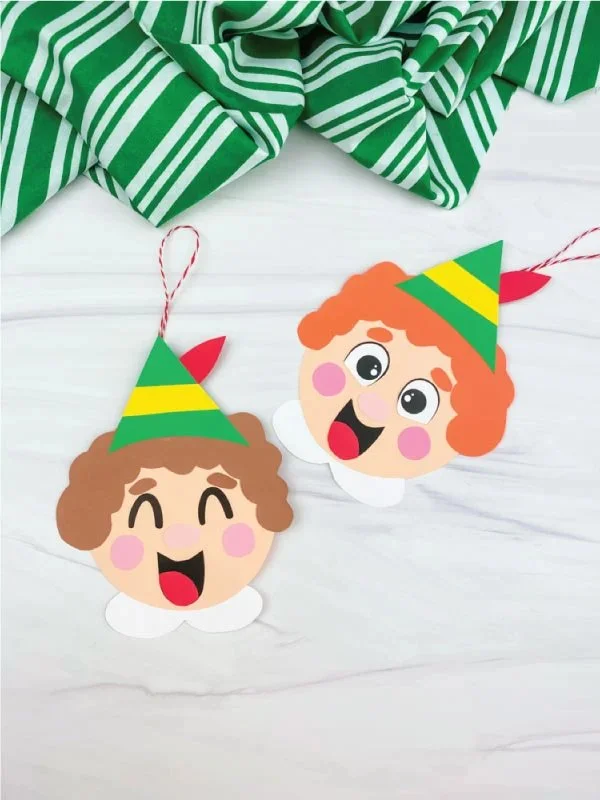
Are you looking for a fun and simple holiday craft? The Buddy The Elf Ornament Craft is a delightful DIY project that fits the bill! Perfectly suited for beginners, this easy craft can be made with just a few materials and is a wonderful addition to your holiday decorations or a thoughtful homemade gift for family and friends. In this article, we’ll guide you through the step-by-step process of crafting your very own Buddy the Elf ornament while incorporating some creative DIY ideas along the way.
WHY YOU WILL LOVE THIS Buddy The Elf Ornament Craft
Making the Buddy The Elf Ornament Craft is an enjoyable experience that offers several benefits:
- Easy for Beginners: This project does not require any advanced crafting skills, making it a great choice for those new to DIY crafts.
- Uses Simple Materials: You won’t need to hunt for complex or expensive supplies for this craft. Many of the materials are common household items.
- Budget-Friendly: If you’re looking for budget-friendly crafts, this ornament fits perfectly within the wallet-friendly category.
- Quick to Make: With a little bit of time, you can create a festive ornament that enhances your holiday décor or serves as a unique gift.
- Great for Home Decor: This fun ornament is a charming addition to your holiday decorations, adding a touch of whimsy wherever it’s placed.
- Perfect for Gifts: Handmade gifts are always well-received, and this ornament is a thoughtful way to share holiday cheer.
- Easy to Customize: The design allows for plenty of personal touches, so you can make a Buddy ornament that reflects your style.
PROJECT DETAILS
Understanding the project details can help you prepare for your crafting fun.
Skill Level
Beginner-friendly. No special skills are required.
Estimated Time
Approximately 30-60 minutes, depending on your crafting speed and whether you wish to laminate your ornament.
Approximate Cost
Low-cost. Most materials can be sourced for under $10.
Best For
Great for family crafts during the holidays, school projects, or a fun workshop.
Project Type
A seasonal craft perfect for your holiday decorations or gifting.
TOOLS AND EQUIPMENT NEEDED
Gathering the right tools will make your crafting experience smoother.
Scissors
Essential for cutting out the ornament pieces and trimming any excess during assembling.
Glue
Use glue to secure the pieces of your ornament together, creating a sturdy final product.
Tape
Helpful for securing the twine on the ornament’s back for hanging.
MATERIALS
Here’s what you will need for this cheerful weekend DIY project:
Colored Cardstock
This will form the base of your ornament. Choose colors that match the Buddy the Elf theme for a bright and festive look.
Glue
A reliable adhesive to hold all the pieces of your ornament together securely.
Red Baker’s Twine
This adds a playful touch for hanging your ornament once it’s finished.
Tape
Use tape to effectively secure the twine on the back of the ornament.
Markers (optional)
You can add additional details or decorations to your ornament using colored markers.
Laminator (optional)
If you want to preserve your ornament for future use, laminating can protect it from wear and tear.
Laminating Sheets (optional)
These are necessary if you decide to laminate your completed ornament.
Elf Ornament Template
Download the template to ensure consistent shapes and sizes when creating Buddy.
HOW TO MAKE Buddy The Elf Ornament Craft
Now that you have everything you need, let’s start creating! Follow these simple steps:
Step 1: Download and Print the Template
Download the elf ornament template and print it onto your colored cardstock. Choose colors that you feel best depict Buddy the Elf to make this ornament a true representation.
Step 2: Cut Out the Pieces
Using scissors, carefully cut out the pieces of the ornament from the cardstock. You’ll want to create Buddy’s head, hat, face features, and collar.
Step 3: Assemble Buddy’s Face
Start by gluing Buddy’s hair to the top of his head. Next, cut out small ovals for his eyebrows or use a matching colored marker to draw them on just beneath the hair.
Step 4: Adding Eyes and Nose
If your face template doesn’t include eyes, glue them on just below the eyebrows. Place his nose below the eyes and secure it with glue.
Step 5: Complete the Face Details
Now we’re onto the cheeks! Glue these underneath the eyes or simply draw them on. Create Buddy’s mouth by gluing a red tongue piece at the bottom.
Step 6: Assemble Buddy’s Hat
Create his elf hat by gluing a yellow band onto the main hat piece. After gluing, trim off any excess paper. Attach a red feather onto the side of the hat for extra detail.
Step 7: Secure the Hat
Carefully take the completed hat and glue it to the top of Buddy’s hair.
Step 8: Add the Collar
Take Buddy’s collar and glue it behind his head, along the bottom edge. This adds to his character!
Step 9: Laminate (Optional)
If you’re choosing to laminate your ornament for durability, now is the time! Laminate your finished piece to preserve it for years to come. Once laminated, cut around the edges.
Step 10: Prepare for Hanging
Take a piece of red baker’s twine and tie it into a loop. Flip the ornament over and tape this to the top back of Buddy’s head.
Now your Buddy the Elf ornament is complete! You can hang it on your tree or give it as a thoughtful handmade gift.
![Buddy The Elf Ornament Craft [Free Template]](https://cdn.contai.io/public/fal-ai-generated/1789832251_6aaeac3bdf5db.png)
TIPS AND TRICKS
- Choosing Materials: Opt for vibrant colors to bring Buddy’s character to life! Cardstock provides the durability needed for a holiday ornament.
- Cutting: Take your time when cutting out the pieces to ensure precision.
- Gluing: Use a thin layer of glue to prevent excess from seeping out and creating a mess.
- Avoiding Mistakes: Double-check the alignment when gluing pieces together to ensure a symmetric look.
- Making it Last: Laminating will help extend the life of your ornament, making it a cherished part of your holiday tradition.
- Safety: When using scissors, always be cautious, especially around young children.
- Time Management: If you plan to make several ornaments, allow yourself enough time to complete each one fully.
VARIATIONS AND CUSTOMIZATION IDEAS
The Buddy the Elf ornament can be customized in many fun ways:
- Different Colors: Mix up the colors of the cardstock for a unique look.
- Different Sizes: Scale the template up or down to create ornaments of various sizes.
- Seasonal Versions: Change Buddy’s outfit according to other holidays like Halloween or Thanksgiving.
- Different Finishes: Add glitter or stickers for added flair if you want a more festive look.
- Personalized Versions: Use a colored marker to write names or initials on Buddy’s collar for personalization.
![Buddy The Elf Ornament Craft [Free Template]](https://cdn.contai.io/public/original_images/42kjInl8pq5wU1RKBtVRIUhiGOpcMMS989IvJUZn.jpg)
Buddy The Elf Ornament Craft FAQ
What skill level is required for the Buddy the Elf Ornament Craft?
This is an easy craft that is perfect for beginners. You don’t need any prior crafting experience to complete this project.
How long will it take to complete this craft?
Expect to spend approximately 30-60 minutes on this project, depending on your crafting pace.
Can I use different materials for this craft?
Absolutely! While the materials listed are recommended, you can personalize the ornament using materials you have at home.
How should I store the finished ornament?
Once your Buddy the Elf ornament is complete and dry, store it in a cool, dry place. If you laminated it, it will be less prone to damage.
Is this craft suitable for young children?
While it is beginner-friendly, parental supervision is advised when using scissors and glue for safety.
CONCLUSION
The Buddy The Elf Ornament Craft is an easy and enjoyable project that is perfect for beginners. With simple materials and straightforward instructions, you can create a delightful piece of DIY home decor or a heartfelt gift. It’s a budget-friendly craft that adds a cheerful touch to your holiday celebrations. We encourage you to try this project and share your experiences or customizations with us—let’s get crafty together!