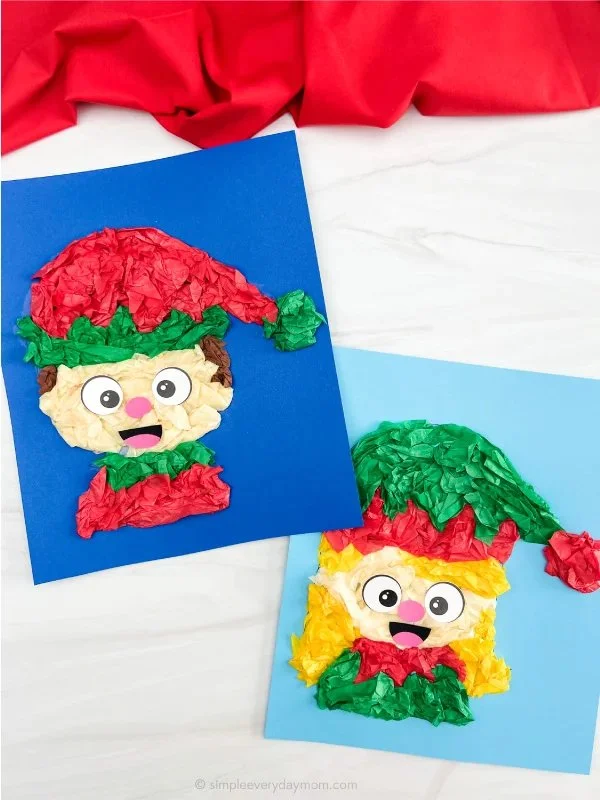
Create magical decorations this holiday season with the Elf Tissue Paper Craft for Kids. This easy DIY project is perfect for those looking for budget-friendly crafts that bring joy and creativity into their homes. With simple materials and beginner-friendly steps, you can make adorable elf figures to decorate your living space or even give as handmade gifts. Follow along for this creative DIY idea that adds a festive touch to your home decor!
WHY YOU WILL LOVE THIS Elf Tissue Paper Craft
If you enjoy crafting and want a simple yet fun project, the Elf Tissue Paper Craft is perfect for you! Here are a few reasons why you will love this craft:
- Easy for beginners: The steps are simple, making it accessible even for those new to DIY projects.
- Uses simple materials: All the materials needed are easy to find and affordable.
- Budget-friendly: This craft doesn’t require expensive supplies, making it a great option for families or classrooms.
- Quick to make: You can complete this project in about an hour, making it a perfect activity for a rainy afternoon.
- Great for home decor: These festive elves can brighten up your home and add holiday cheer.
- Easy to customize: Add your personal touch with different colors, patterns, or elements.
- Fun for kids: This project is a great way to engage kids in creative activities during the holiday season.
PROJECT DETAILS
Skill Level
Beginner-friendly. This craft is suitable for kids and adults alike, making it a versatile choice for family projects.
Estimated Time
About 60 minutes. This includes time for cutting, gluing, and allowing for any drying.
Approximate Cost
Low-cost. Most of the materials can be found around the house or at a local store for minimal expense.
Best For
This project is ideal for families, classrooms, or as a festive solo activity during the holidays.
Project Type
Seasonal craft. These festive elves are perfect for decoration during the holiday season.
TOOLS AND EQUIPMENT NEEDED
Scissors
Used for cutting tissue paper and other materials to create shapes.
Glue
Essential for adhering pieces together. A glue stick or white school glue works well.
Ruler
Useful for measuring and evenly cutting tissue paper.
Pencil
Used for marking cutting lines or tracing templates.
MATERIALS
Tissue Paper
The main material for the elf bodies. Choose colorful tissue paper to make your elves vibrant and fun.
Cardstock
Used for the base of the elves. It provides stability and shape to the finished craft.
Googly Eyes
Add personality to your elves! These small, movable eyes are perfect for creating a fun expression.
Markers or Crayons
Use these for additional details or to draw on the elves.
Ribbon or String
A decorative element for hair or to hang the elves if you choose.
Free Template
A printable template to help shape the elf bodies easily. These can be traced or printed directly onto the cardstock.
HOW TO MAKE Elf Tissue Paper Craft
Step 1: Gather Your Materials
Start by gathering all your materials and tools. Have everything ready to make the crafting process smooth and enjoyable.
Step 2: Print the Free Template
Download and print the elf template. If you don’t have a printer, you can draw the shape of an elf on the cardstock using a pencil.
Step 3: Cut Out the Template
Using scissors, carefully cut out the printed elf template. This will give you the base shape for your tissue paper elves.
Step 4: Trace on Cardstock
Place the template on your cardstock and trace around it using a pencil. You can create as many elves as you’d like by repeating this step.
Step 5: Cut Out Cardstock Shapes
Now, cut out the traced shapes from the cardstock. This is the body of your elf.
Step 6: Prepare the Tissue Paper
Take your colorful tissue paper and tear it into small squares. These will add texture and color to your elves.
Step 7: Glue Tissue Paper onto Cardstock
Begin gluing the tissue paper squares onto the cardstock shape, overlapping them slightly until the entire body is covered.
Step 8: Add Googly Eyes
Glue the googly eyes onto the face of your elf. You can position them however you like to give each elf its own personality.
Step 9: Decorate
Use markers or crayons to add details like a smile, buttons, or decorations to the elf’s outfit.
Step 10: Attach Ribbon or String (optional)
If you want to hang your elves, cut a piece of ribbon or string and glue it to the top of the head. This way, you can display your festive creations.
![Elf Tissue Paper Craft For Kids [Free Template]](https://cdn.contai.io/public/fal-ai-generated/1789832253_6aaeac3d90de7.png)
TIPS AND TRICKS
- Choosing materials: Go for bright colors that stand out! Using shiny tissue paper can add a nice sparkle to your decorations.
- Cutting: For neat edges, use sharp scissors. If you’re crafting with kids, supervise their cutting to ensure safety.
- Gluing: Apply a thin layer of glue to avoid wetness that can tear the tissue. Allow the glue to dry completely before moving the crafts.
- Personalizing: Encourage kids to express their creativity by allowing them to add their personal touch with stickers or other embellishments.
- Storage: Store the finished crafts in a cool, dry place to maintain their shape and color.
- Durability: These tissue paper crafts are best kept indoors, as exposure to moisture can damage them.
VARIATIONS AND CUSTOMIZATION IDEAS
- Different Colors: Use traditional red and green for a classic holiday look, or mix vibrant colors for a more modern style.
- Sizes: Create larger elves by enlarging the template on a copy machine or draw freehand.
- Seasonal Versions: Change the design for other seasons—make them into bunnies for Easter or use autumn colors for fall themes.
- Different Patterns: Instead of plain tissue paper, look for patterned options like stripes or polka dots to give your elves a unique style.
- Holiday Versions: Decorate elves with Santa hats or add holiday-themed accessories like candy canes or gifts.
![Elf Tissue Paper Craft For Kids [Free Template]](https://cdn.contai.io/public/original_images/MuRLQG9vAEXfMNxcYtHseNSiZRf7H7gwMl2gXi5G.jpg)
Elf Tissue Paper Craft FAQ
1. Is this craft difficult for beginners?
No, the Elf Tissue Paper Craft is beginner-friendly and can easily be completed by kids and adults alike!
2. What materials do I need for this project?
You will need tissue paper, cardstock, googly eyes, glue, scissors, markers or crayons, and optional ribbon or string.
3. How long does it take to make the elves?
The project takes about 60 minutes from start to finish.
4. How should I store the finished crafts?
Keep your elves in a cool, dry place to prevent them from becoming damaged. Flat storage helps maintain their shape.
5. Can I customize the elves?
Absolutely! You can change colors, patterns, sizes, and other decorative elements to fit your style.
CONCLUSION
The Elf Tissue Paper Craft is an easy, budget-friendly DIY project that brings holiday cheer into your home. With simple materials and clear instructions, even beginners can create charming decorations. This craft offers a wonderful way to engage with family, and the possibilities for customization make it a fun, creative activity for everyone. Give this project a try, and share your experience and finished creations! Your holiday décor will be transformed into something truly magical!