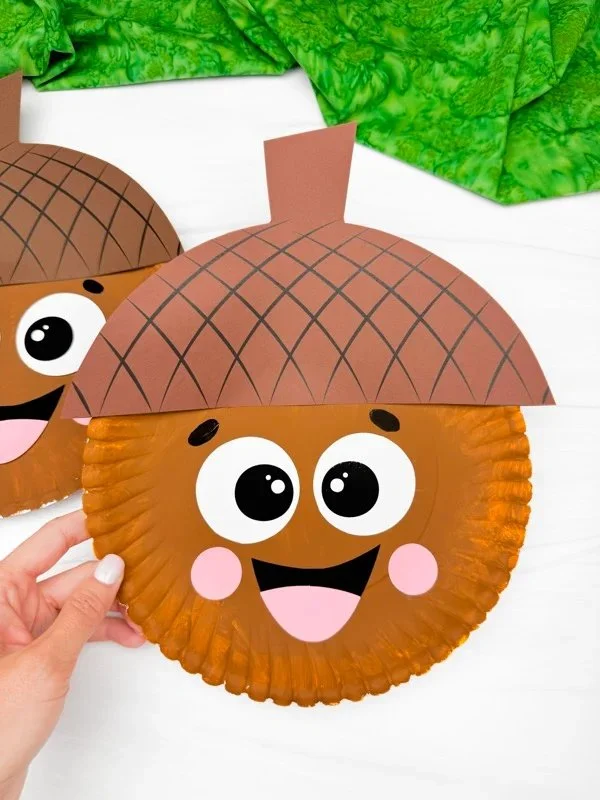
Making a Paper Plate Acorn Craft is a delightful and creative DIY project perfect for both children and adults. This easy craft can be done with materials you likely already have at home, making it a budget-friendly and enjoyable activity. Not only is it a fun way to spend time, but it also allows you to create cute decorations that can brighten up your home for the fall season. In this article, we will guide you through this simple craft, detailing everything you need to know about the Paper Plate Acorn Craft, including materials, instructions, variations, and helpful tips.
WHY YOU WILL LOVE THIS Paper Plate Acorn Craft
This Paper Plate Acorn Craft is an excellent DIY project for many reasons:
- Easy for Beginners: The steps are simple enough that even those new to crafting will feel confident completing it successfully.
- Uses Simple Materials: Most materials are easy to find, making it an ideal project for all ages.
- Budget-Friendly: Minimal costs involved since you can often use what you have at home.
- Quick to Make: This craft can be completed in an hour or less, making it perfect for a quick session.
- Great for Home Decor: The finished acorns make charming additions to your fall decorations.
- Easy to Customize: You can modify colors and patterns to create unique pieces.
- Perfect for Seasonal Decorating: Celebrate autumn by using these acorns for seasonal displays.
PROJECT DETAILS
Skill Level
Beginner. This project is designed to be simple enough for crafters of all skill levels.
Estimated Time
Approximately 30-60 minutes. Most of the time will be spent designing and decorating your acorns.
Approximate Cost
Low to minimal. This project mainly uses inexpensive materials, often already found around the house.
Best For
This project is great for families, classrooms, or anyone looking for a fun indoor activity.
Project Type
A simple craft, perfect for beginners, especially during the fall season.
TOOLS AND EQUIPMENT NEEDED
Scissors
Scissors are essential for cutting paper plates to create your acorns. Make sure to use child-safe scissors if kids are participating.
Glue or Glue Stick
Adhesive is necessary to attach different parts of the acorns. A glue stick is cleaner and easier for younger children to handle.
Paintbrush (optional)
If you choose to paint your acorns, a small paintbrush will help apply the paint evenly.
Markers or Crayons
Markers or crayons can be used for coloring and personalizing your acorns.
MATERIALS
Paper Plates
The main material for this craft. You will cut the paper plates into the shapes needed for the acorn tops and bottoms.
Brown and Green Construction Paper
This paper is used to make the acorn caps and accent details. Feel free to use other fall colors if desired.
Paint (optional)
Acrylic or tempera paint can add an artistic touch to your acorns, enhancing their visual appeal.
String or Ribbon (optional)
This can be attached to your finished acorns if you want to hang them as decorations.
Decorative Items (optional)
Items like stickers, glitter, or sequins can be added for extra flair.
HOW TO MAKE Paper Plate Acorn Craft
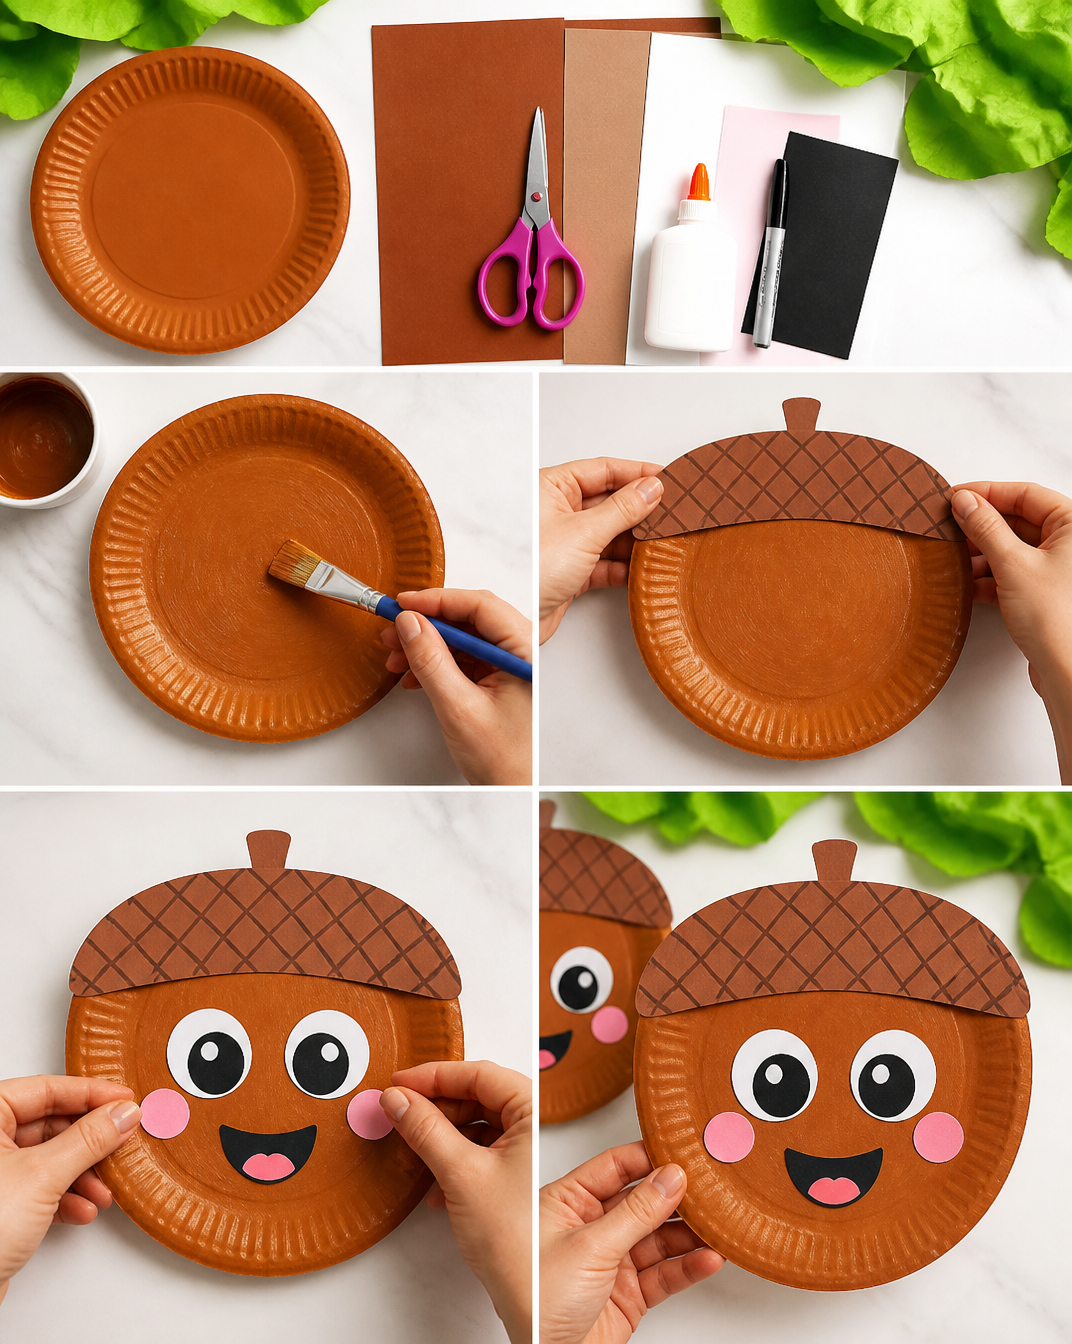
Step 1: Prepare Your Materials
Gather all your materials and tools in one place. This will make your crafting process smoother and ensure you have everything you need.
Step 2: Cut the Paper Plates
Take the paper plates and cut them into two parts: larger circles for the acorn bottoms and smaller sections for the acorn caps. You can make the sizes as large or small as you like, depending on your preference.
Step 3: Decorate the Acorn Bottoms
Using markers, paints, or crayons, decorate the large paper plate circles to resemble the base of an acorn. Choose earthy tones like brown and tan to mimic the natural look.
Step 4: Create the Acorn Caps
Cut shapes from the brown or green construction paper to serve as the caps of the acorns. These can be round or leaf-like, based on your design choice.
Step 5: Assemble the Acorns
Once the bottoms and caps are decorated, glue them together. Ensure the caps are securely attached to the tops of the acorn bottoms.
Step 6: Personalize Your Crafts
Here’s the fun part! Add any additional decorations or personal touches you like, such as glitter, stickers, or even writing a little message on them.
Step 7: Allow to Dry
If you’ve used paint or a lot of glue, allow your acorns to dry completely before using them as decorations.
TIPS AND TRICKS
- Choosing Materials: Choose thicker paper plates for sturdier acorns. For younger children, consider pre-cut shapes to simplify the project.
- Cutting: Help younger children with cutting to avoid any accidents and ensure that their pieces are shaped correctly.
- Gluing: Use a glue stick for less mess. If using liquid glue, apply it sparingly, as too much can warp the paper.
- Avoid Common Mistakes: Allow paint and glue to dry fully before handling to prevent smudging and damage to your work.
- Making the Project Easier: Prepare all pieces in advance for kids to assemble, making it a straightforward process without overwhelming them.
- Saving Money: Use recycled materials like old magazines for decoration or even other colored paper scraps.
- Making the Craft Last Longer: Once finished, consider using a spray sealant to protect the decorations if you plan on using them outside.
- Working Safely: Always supervise younger children when using scissors or other sharp tools.
VARIATIONS AND CUSTOMIZATION IDEAS
- Different Colors: Use various shades of browns and greens or go bright with other fall colors like reds and yellows.
- Different Sizes: Make larger or smaller acorns depending on your liking or the display area.
- Different Materials: Feel free to use fabric scraps or felt for a softer textured look.
- Seasonal Versions: Change the decor for different seasons by adding thematic elements, such as snowflakes for winter.
- Personalized Versions: Customize acorns with initials or special dates to create unique gifts.
- Create a Garland: String multiple acorns together for a beautiful autumn garland.
- Use as Table Decorations: Create mini acorns for place settings at a meal to delight your guests.
Paper Plate Acorn Craft FAQ
Is this Paper Plate Acorn Craft difficult?
No, it is quite easy and perfect for beginners, including kids. It involves simple cutting and gluing.
What materials do I need for this project?
You will need paper plates, construction paper, glue, and optionally, markers or paints. Other decorative items can be added for personalized touches.
How long does it take to complete this project?
This craft can typically be completed in about 30 to 60 minutes, depending on how intricate you choose to make your designs.
How do I store the finished acorns?
If stored properly in a cool, dry place, the acorns should last for several seasons. You can keep them in a small box or basket to prevent damage.
Can I use this craft for holidays?
Absolutely! The acorns can be decorated for various holidays by changing colors and embellishments to fit themes like Halloween or Thanksgiving.
CONCLUSION
The Paper Plate Acorn Craft is a wonderful, easy craft idea that can bring joy to your home during the fall season. With its beginner-friendly approach, you can create charming decorations or handmade gifts in no time. This budget-friendly DIY project is a fantastic way to spend an afternoon with family or friends while engaging in a creative activity. We encourage you to give it a try and share your experiences or any unique customization ideas you come up with!